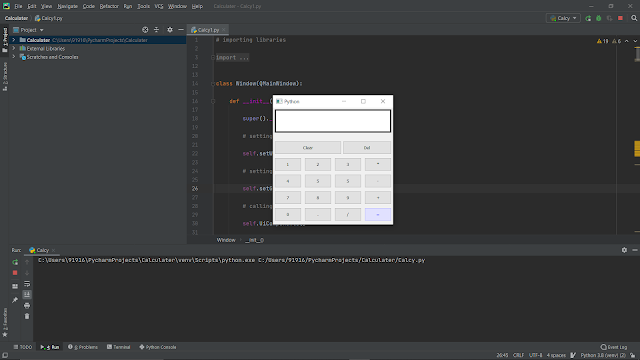
Calculator using python 🤩
We have made a calculator using python language.
We can calculate easily on that calculator.
Here's are the code for the Calculator
# importing libraries
from PyQt5.QtWidgets import *

from PyQt5 import QtCore, QtGui

from PyQt5.QtGui import *

from PyQt5.QtCore import *

import sys


class Window(QMainWindow):

    def __init__(self):

        super().__init__()

        # setting title
        self.setWindowTitle("Python ")

        # setting geometry
        self.setGeometry(100, 100, 360, 350)

        # calling method
        self.UiComponents()

        # showing all the widgets
        self.show()

        # method for widgets
    def UiComponents(self):

        # creating a label
        self.label = QLabel(self)

        # setting geometry to the label
        self.label.setGeometry(5, 5, 350, 70)

        # creating label multi line
        self.label.setWordWrap(True)

        # setting style sheet to the label
        self.label.setStyleSheet("QLabel"
                                 "{"
                                 "border : 4px solid black;"
                                 "background : white;"
                                 "}")

        # setting alignment to the label
        self.label.setAlignment(Qt.AlignRight)

        # setting font
        self.label.setFont(QFont('Arial', 15))

        # adding number button to the screen
        # creating a push button
        push1 = QPushButton("1", self)

        # setting geometry
        push1.setGeometry(5, 150, 80, 40)

        # creating a push button
        push2 = QPushButton("2", self)

        # setting geometry
        push2.setGeometry(95, 150, 80, 40)

        # creating a push button
        push3 = QPushButton("3", self)

        # setting geometry
        push3.setGeometry(185, 150, 80, 40)

        # creating a push button
        push4 = QPushButton("4", self)

        # setting geometry
        push4.setGeometry(5, 200, 80, 40)

        # creating a push button
        push5 = QPushButton("5", self)

        # setting geometry
        push5.setGeometry(95, 200, 80, 40)

        # creating a push button
        push6 = QPushButton("5", self)

        # setting geometry
        push6.setGeometry(185, 200, 80, 40)

        # creating a push button
        push7 = QPushButton("7", self)

        # setting geometry
        push7.setGeometry(5, 250, 80, 40)

        # creating a push button
        push8 = QPushButton("8", self)

        # setting geometry
        push8.setGeometry(95, 250, 80, 40)

        # creating a push button
        push9 = QPushButton("9", self)

        # setting geometry
        push9.setGeometry(185, 250, 80, 40)

        # creating a push button
        push0 = QPushButton("0", self)

        # setting geometry
        push0.setGeometry(5, 300, 80, 40)

        # adding operator push button
        # creating push button
        push_equal = QPushButton("=", self)

        # setting geometry
        push_equal.setGeometry(275, 300, 80, 40)

        # adding equal button a color effect
        c_effect = QGraphicsColorizeEffect()

        c_effect.setColor(Qt.blue)

        push_equal.setGraphicsEffect(c_effect)

        # creating push button
        push_plus = QPushButton("+", self)

        # setting geometry
        push_plus.setGeometry(275, 250, 80, 40)

        # creating push button
        push_minus = QPushButton("-", self)

        # setting geometry
        push_minus.setGeometry(275, 200, 80, 40)

        # creating push button
        push_mul = QPushButton("*", self)

        # setting geometry
        push_mul.setGeometry(275, 150, 80, 40)

        # creating push button
        push_div = QPushButton("/", self)

        # setting geometry
        push_div.setGeometry(185, 300, 80, 40)

        # creating push button
        push_point = QPushButton(".", self)

        # setting geometry
        push_point.setGeometry(95, 300, 80, 40)

        # clear button
        push_clear = QPushButton("Clear", self)

        push_clear.setGeometry(5, 100, 200, 40)

        # del one character button
        push_del = QPushButton("Del", self)

        push_del.setGeometry(210, 100, 145, 40)

        # adding action to each of the button
        push_minus.clicked.connect(self.action_minus)

        push_equal.clicked.connect(self.action_equal)

        push0.clicked.connect(self.action0)

        push1.clicked.connect(self.action1)

        push2.clicked.connect(self.action2)

        push3.clicked.connect(self.action3)

        push4.clicked.connect(self.action4)

        push5.clicked.connect(self.action5)

        push6.clicked.connect(self.action6)

        push7.clicked.connect(self.action7)

        push8.clicked.connect(self.action8)

        push9.clicked.connect(self.action9)

        push_div.clicked.connect(self.action_div)

        push_mul.clicked.connect(self.action_mul)

        push_plus.clicked.connect(self.action_plus)

        push_point.clicked.connect(self.action_point)

        push_clear.clicked.connect(self.action_clear)

        push_del.clicked.connect(self.action_del)

    def action_equal(self):

        # get the label text
        equation = self.label.text()

        try:

            # getting the ans
            ans = eval(equation)

            # setting text to the label
            self.label.setText(str(ans))


        except:

            # setting text to the label
            self.label.setText("Wrong Input")

    def action_plus(self):

        # appending label text
        text = self.label.text()

        self.label.setText(text + " + ")

    def action_minus(self):

        # appending label text
        text = self.label.text()

        self.label.setText(text + " - ")

    def action_div(self):

        # appending label text
        text = self.label.text()

        self.label.setText(text + " / ")

    def action_mul(self):

        # appending label text
        text = self.label.text()

        self.label.setText(text + " * ")

    def action_point(self):

        # appending label text
        text = self.label.text()

        self.label.setText(text + ".")

    def action0(self):

        # appending label text
        text = self.label.text()

        self.label.setText(text + "0")

    def action1(self):

        # appending label text
        text = self.label.text()

        self.label.setText(text + "1")

    def action2(self):

        # appending label text
        text = self.label.text()

        self.label.setText(text + "2")

    def action3(self):

        # appending label text
        text = self.label.text()

        self.label.setText(text + "3")

    def action4(self):

        # appending label text
        text = self.label.text()

        self.label.setText(text + "4")

    def action5(self):

        # appending label text
        text = self.label.text()

        self.label.setText(text + "5")

    def action6(self):

        # appending label text
        text = self.label.text()

        self.label.setText(text + "6")

    def action7(self):

        # appending label text
        text = self.label.text()

        self.label.setText(text + "7")

    def action8(self):

        # appending label text
        text = self.label.text()

        self.label.setText(text + "8")

    def action9(self):

        # appending label text
        text = self.label.text()

        self.label.setText(text + "9")

    def action_clear(self):

        # clearing the label text
        self.label.setText("")

    def action_del(self):

        # clearing a single digit
        text = self.label.text()

        print(text[:len(text) - 1])

        self.label.setText(text[:len(text) - 1])

    # create pyqt5 app

App = QApplication(sys.argv)

# create the instance of our Window
window = Window()

# start the app
sys.exit(App.exec())
Here's the video for the example and idea.


2 Comments
Click here for CommentsWe provide Classroom training on IBM Certified Data Science at Hyderabad for the individuals who believe hand-held training. We teach as per the Indian Standard Time (IST) with In-depth practical Knowledge on each topic in classroom training, 80 – 90 Hrs of Real-time practical training classes. There are different slots available on weekends or weekdays according to your choices. We are also available over the call or mail or direct interaction with the trainer for active learning.
ReplyFor any queries feel free to Call/WhatsApp us on +91-9951666670 or mail at info@innomatics.in
data
science training in hyderabad
Data Science Course in Hyderabad
Incredibly conventional blog and articles. I am realy very happy to visit your blog. Directly I am found which I truly need. Thankful to you and keeping it together for your new post.
Replydata analytics training in yelahanka
ConversionConversion EmoticonEmoticon